Your GitHub clone stats, visualized and celebrated.
Track weekly trends, highlight milestones, and share visual dashboards—all automatically.
![]()
These are live examples of the badges.
The Milestone badge automatically starts celebrating #clones milestones:
- See the celebration badge in action here
- Checkout the script to see milestones and configuration of the badge.
- You can adjust milestones in fetch_clones.py → MILESTONES list.
ClonePulse is a GitHub-friendly toolchain that fetches, tracks, and visualizes repository clone activity.
It offers:
- Daily clone tracking (total + unique)
- 12-week visual dashboard (.PNG image)
- Automatic milestone detection (e.g., 500, 1K, 2K+ clones)
- Auto-annotations for clone spikes
- Annotations can be manually added to
clonepulse/fetch_clones.json(for example date of post on reddit)
- Annotations can be manually added to
- Badge generation for README inclusion
- GitHub Actions support for automation
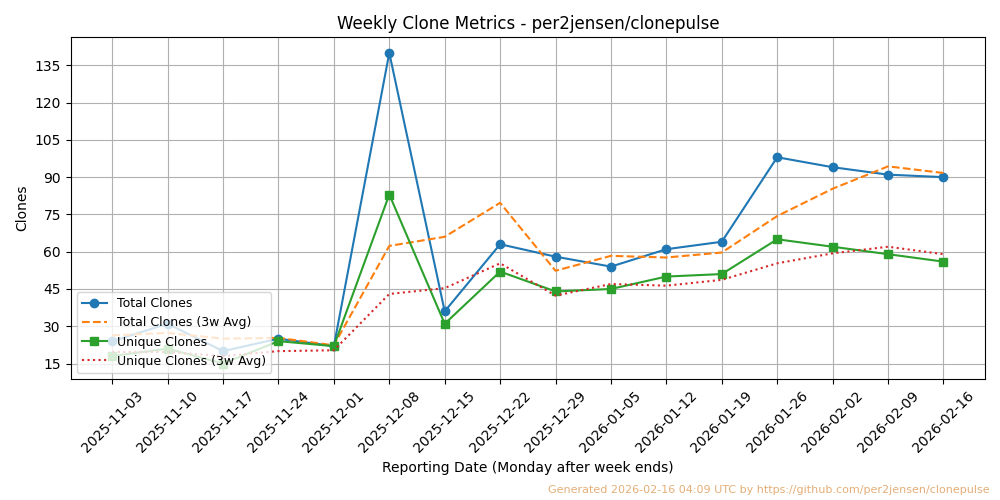
A weekly clone activity chart is automatically updated and saved in
doc/weekly_clones.png.
It is intended to run every Monday morning. Data from the current week is discarded - only data for full weeks are shown.

-
Create a secret (see below)
-
Add the secret to your repo (see below)
-
Drop the essentials into your repo
-
Copy these badge links to your README.md and replace
your-username/your-repowith your actual GitHub username and repository name.
[](https://github.com/your-username/your-repo/blob/main/clonepulse/weekly_clones.png)
[](https://github.com/your-username/your-repo/blob/main/clonepulse/weekly_clones.png)
ClonePulse fetches traffic (clone) stats from the GitHub API. This requires a Personal Access Token (PAT) with read-only access to Read access to administration and metadata. Here's how to create one securely and use it with GitHub Actions.
For public repositories, a fine-grained token with Read access to administration and metadata access is sufficient.
For private repositories, you will also need:
- Repository contents: Read-only
- Repository metadata: Read-only
- Repository traffic: Read-only
Visit: https://github.com/settings/tokens
Click "Generate new token" → "Fine-grained token"
Configure:
Name: e.g., "your repository"_ClonePulse
Expiration: e.g., 90 days
Resource owner: Your user or organization
Repository access: Select the specific repo
Set the following permissions on the token:
- "Administration": Read-only
- "Metadata": Read-only
- For Private repos you might need more.....
Click "Generate token" and copy the value of the token to secure storage immediately. You only see it once.
After having created the secret, you must now put it into the repository where you want to use it.
-
Go to your GitHub repository:
Settings → Secrets and variables → Actions → New repository secret -
Name the secret:
CLONEPULSE_METRICS -
Paste the token you copied and save.
The workflow references the secret as an environment variable in this way:
- name: Run fetch_clones.py
  env:
    TOKEN: ${{ secrets.CLONEPULSE_METRICS }}
run: python src/clonepulse/fetch_clones.pyCreate a tarball with the needed artifacts as shown below and extract the contents into your repository of choice.
Your destination repository must be somewhere on disk in a local git repo.
Take a look at SETUP.md also.
# create tarball with
#  - 2 .github workflows
#  - artifacts in clonepulse/
#  - the python scripts in src/clonepulse/
tar --exclude='.github/workflows/py-tests.yml' \
    --exclude='clonepulse/weekly_clones.png' \
    --exclude='*/__pycache__' --exclude='*.pyc' \
    -cvf clonepulse-artifacts.tar \
    {src/clonepulse,clonepulse,.github/workflows}

# extract artifacts to destination repo
tar -xvf clonepulse-artifacts.tar -C <your repo>
After extraction, ensure that:
clonepulse/ and src/clonepulse/ exist in your repo root
GitHub Actions are in .github/workflows/
These instructions are only needed if you want to hack on ClonePulse
# python3 and a few packages are needed.
# This works on Ubuntu 24.04
sudo apt update
sudo apt install -y git python3 python3-venv python3-pip

git clone https://github.com/your-user/clonepulse.git
cd clonepulse
./build.sh  # Creates virtualenv and installs dependencies
This sets up a Python virtual environment and installs dependencies listed in pyproject.toml.
Found a bug or have a suggestion?
Feel free to open an issue or submit a pull request!